| Chess owns your bones. |
|
| Author: | |
| IP: | 12-233-1XXXX |
| Date: | 12/19/01 08:12 |
| Game Type: | Other |
| Labels: | none |
|
Report Rating: , # of Ratings: 1, Max: 8, Min: 8
Lifetime Rating for citizenKane: 8.2143 |
 |
Welcome to another chess report by yours truly. I wrote my first chess report over a year ago, and it sucked. Darn. I started writing this new one over a year ago, in an attempt to make a chess report that’s actually GOOD, but it died on move 18. I ressurected it primarily because I was bored one day. It is a major improvment over my first chess report (thank God) and I hope it will get gold, but we’ll see :]
I wrote this report so that the chess layperson could understand it. You do not have to know chess notation or be a chess genius to understand this report. Occasionally, I give little segments of (really short) analysis, and if you want to, you can skip over them, but I would suggest reading them.
I also occasionally refer to numbers on the grid:
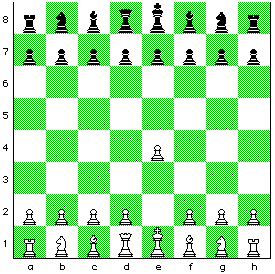
See the letters on the bottom, and the numbers on the side? The square “a1” would be the rook’s square, and “e4” would be the pawn sticking out from the rest of them. It’s simple.
As I said earlier, I’ve kept this kind of “technical stuff” down to a minimum. Don’t panic!
Now to the report.
Today, we see on the White side Wilhelm Steinitz, late champion of the world for no less than 27 years. He was a brilliant person. He was called an “iron logician”, because every move he made contributed to some sort of master plan. Most players back then (1895) simply brought out a couple of pieces and launched a crazed attack. Stienitz would block them with ease.
On the Black side is Kurt von Bardeleben. Legend has it he commited suicide when deciding whether he should play chess or get a life. Why he decided the solution would be to kill himself, I do not know.
Anywhoo, on with the game!
Wilhelm Steinitz
vs.
Kurt von Bardeleben
or
The Rudest Chess Ga(y)me Ever
The Game Starts Here
|
|
1. e4
This is the most common first move in chess history. There are three very good reasons for this: It takes control of the center of the board, uncorks the awesome power of the queen and unleashes the bishop on f1. The downside of the move is that it exposes both the king and pawn to attack, but that’s usually not a problem.
|
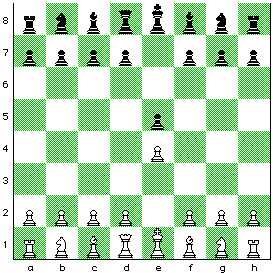
1. ...e5
This is the standard reply. Black has many other options, but this is the most popular one. Back then, it was considered THE ONLY move Black could make! Other moves were considered vastly inferior.
It has all the advantages and disadvantages of White’s move, in that it uncorks the queen and bishop and takes a bite of the center, but exposes itself (and the king sitting behind it) to attack.
|

2. Nf3
Again, the standard reply. There are many other options, but this is the most popular one.
It is a very logical move (and Steinitz was an iron logician!): White is directly attacking Black’s pawn on e5 while simultaneously bringing out a piece. Back then, attacking was considered the most important thing. Screw defense, screw position— attack!
|
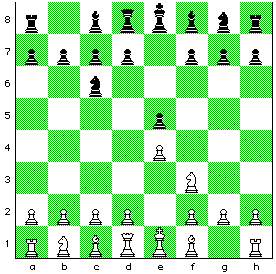
2. ...Nc6
The standard reply, bringing out a knight and more importantly, defending the assailed pawn.
Black has other ways to defend the pawn, but this way is considered the best because it gives Black a chance to mount a counterattack. The best offense is a good defense :o
|
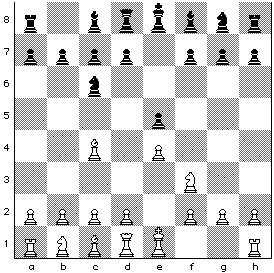
3. Bc4
This, called the "Italian Game", was the standard reply in that period, and it is probably one of the best openings White can play. It’s not that popular nowadays because it is a very complicated opening.
With this move, White brings out a bishop, locks his control of the d5 square, and also puts pressure on the f7 pawn, which is defended only by Black’s king.
|
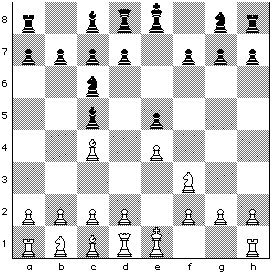
3. ...Bc5
Black moves his Bishop for the same reason White does. He wants to bring out his pieces as fast as he can, so that he could mount an effective counterattack. He’s also locked down his control of the d4 square.
Or has he?
*insert ominous music here*
|
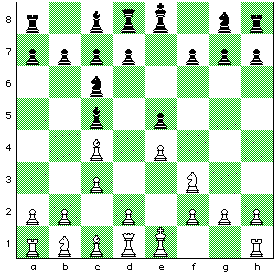
4. c3
This opening is called the Giuoco Piano, and it was quite popular in those times.
Giuoco Piano means "quiet game", but the Giuoco Piano is anything but. White now plans to play pawn-to-d4, busting the chessboard open and sending pieces all over the place.
|
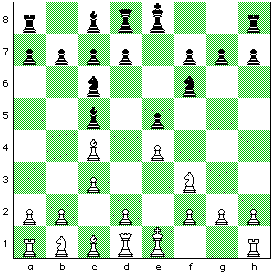
4. ...Nf6
The standard reply (again).
Black can't block white's threatened move, pawn-to-d4. I dare you to find a way.
Thought you couldn’t.
:P
The best defense is a good offense, right? Since Black can’t defend against White’s threat, he counterattacks. Makes sense!
|
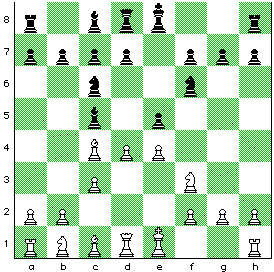
5. d4
The standard reply... again.
Black makes a threat, and White callously ignores it. The fight is on!
|
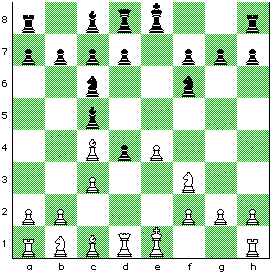
5. ...exd4
The classic retort (yet again!)
Black has two options: Defend the pawn, or use it to blow a hole in White’s position. He chooses the latter.
|
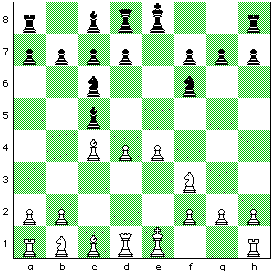
6. cxd4
Yet again, the classic retort.
White’s position, at this point, looks pretty spiffy. His greedy pawns have eaten up all the center, and to top it off, they’re attacking Black’s bishop! But wait! Isn’t White’s king exposed?
|
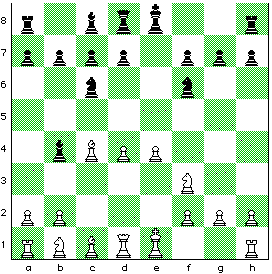
6. ...Bb4+
The standard reply.
Not much to be said about this: The bishop gives check to White’s king. White must block the check.
|
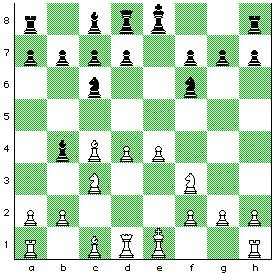
7. Nc3
White has blocked the check.
But wait! White's knight isnt defending the pawn on e4, because he's 'pinned' to the king! If the knight moves, the king would be placed in check! That means White’s pawn is free for the taking.
|
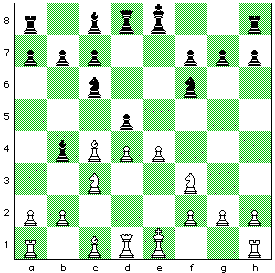
7. ...d5?
Black declines White’s offer to munch the pawn. He could be greedy and snatch the pawn, but decides it would be a better idea to mount his own counterattack.
He should have taken the pawn. :p
|
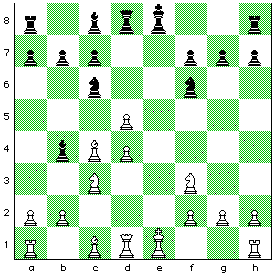
8. exd5
Munching the pawn.
|

8. ...Nxd5
The sensible reply.
What if Oddjob's bowler hat was a weapon in Goldeneye (the game)? That would be so cool.
Ahem, back to the game.
|
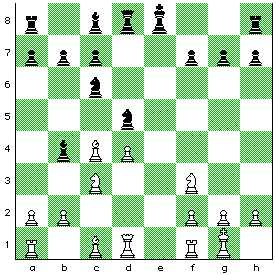
9. 0-0
White tucks his king away and prepares to bring out his Rook.
Stienitz (white) is again willing to ditch some material (on c3) in return for a strong counterattack.
|
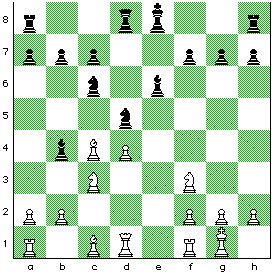
9. ...Be6(?)
Von Bardeleben (Black) should have munched the knight. Instead, he decides to focus on the "key" d5 square, but he is playing a passive, boring game. In chess, as in Starcraft, playing passively is suicide!
|
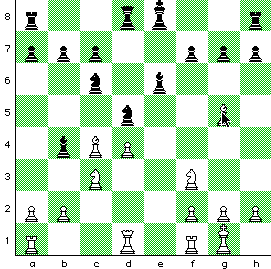
10. Bg5
Stienitz devolopes a piece with a threat on the queen. Now Black must take a moment respond to the threat.
Notice that a rogue cursor has found its way onto the chessboard. It appears to be trying to assail the poor bishop. Fortunately, the cursor soon leaves and White’s Bishop can get on with its life.
|
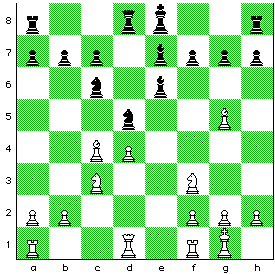
10. ...Be7
Black goes and blocks the threat, but now his bishop is in a bad spot. Note how White has placed his pieces on better squares than Blacks’.
|
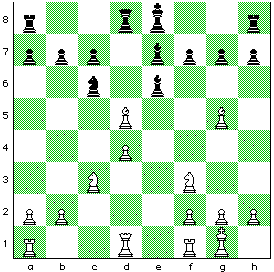
11. Bxd5(!)
Woah! What’s this? White has an attack going, and he’s supposed (according to chess principle) to hold on to all his pieces so that his attack would be stronger. But instead, he is swapping down!
|
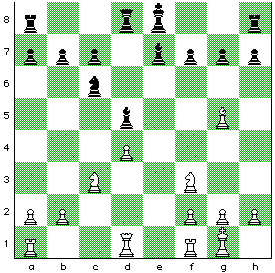
11. ...Bxd5
Not much to say about this move here. White takes Black piece, Black takes White piece.
|
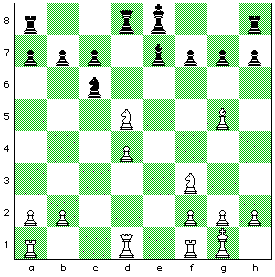
12. Nxd5
White is trading off some more pieces. But why is he doing this? Watch and see, young Padawan.
|

12. ...Qxd5
Recapturing the lost piece.
|

13. Bxe7
Trading off another piece!
|
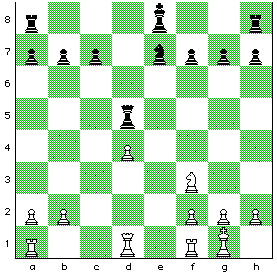
13. ...Nxe7
He must recapture with the knight.
Recapturing with the king is a horrible idea. It would stick the king out in the open, and doing so would be suicide.
|
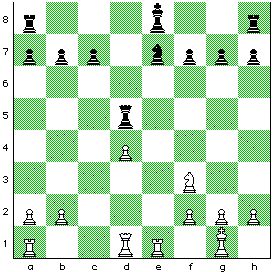
14. Re1!
What was the point of all these trades?
Well, look. Black’s pieces are stuck on bad squares. His rooks are big honking towers of uselessness. He hasn’t even castled. His queen is sitting out there in the middle, waiting to be raped by some White piece.
To top it off, his knight is pinned to the king, and the king can’t even move because it has to defend the knight!
Sucks for Von Bardeleben.
|

14. ...f6
Black is in trouble. His King is stuck out there in the middle of the chessboard.
He hopes to escape his perdicament by playing king to f7, rook to e8, then king to g8. This is known as 'castling by hand'.
But does Black have time to do so? Watch and see!
|
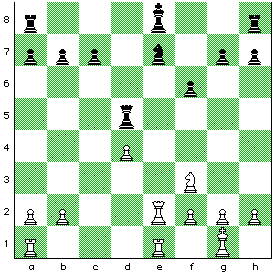
15. Qe2
White’s made a threat on the Black knight, and Black has to take the time to respond. His King will have to wait.
|
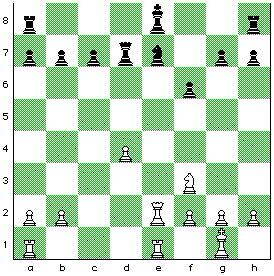
15. ...Qd7
Defending the threat.
Black still wants to move king-to-f7, but he hasn’t been able to yet. His king will have to wait.
|
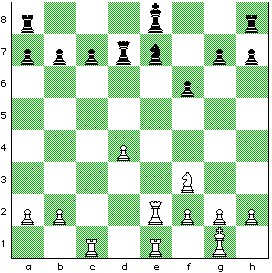
16. Rac1
Stienitz (white) just won’t let up the pressure. He makes a threat on Black’s c7-pawn, so Black has to take the time to respond. His King, though it is growing impatient, will have to wait.
|
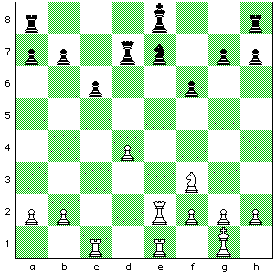
16. ...c6
Now the c-pawn is defended by the pawn on b7. Black (once again) wants to play king-to-f7.
|
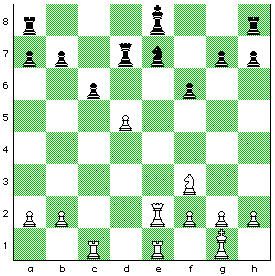
17. d5
Very nice.
White wants to plant his knight on the d4 square, but the pawn is in the way. Solution? Get rid of it :)
|
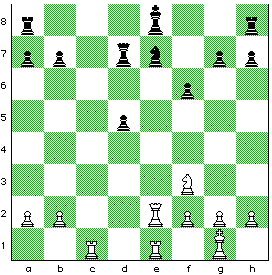
17. ...cxd5
The sensible move ;p
He has to take with the pawn. He can’t take with the knight because it’s stuck in front of the king. He can’t take with the queen because it’s stuck guarding the knight. What a dilema!
Black’s King is growing very impatient. Will it ever get the chance to go to f7?
|

18. Nd4
Planting his knight on the d4 square. From this square it dominates the board.
Note how White’s pieces are all positioned perfectly, while Black’s pieces are stuck on useless squares. His rooks haven’t even moved yet!
|

18. ...Kf7
It was a long time coming, but black FINALLY got his king to f7.
Now will he get the chance to bring his stupid rooks into the game?
|
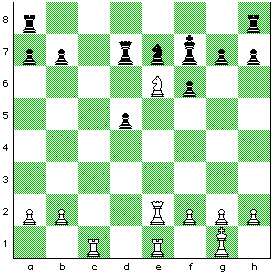
19. Ne6
Stienitz just won’t let up the pressure! He threatens to plant a rook on c7 (supported by the Knight), and a "pig on the seventh" can make life miserable. Once again, Von Bardeleben must take a moment to respond.
|
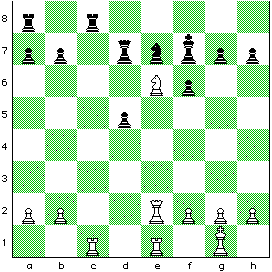
19. ...Rhc1
Now that the c7-square is defended, Von Bardeleben can sit tight and hope Steinitz will let up the pressure.
|
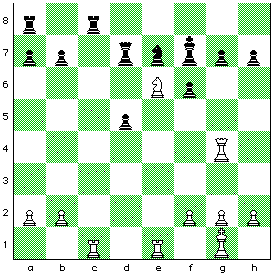
20. Qg4
Stienitz, of course, most certianly will not let up the pressure. He plans to take the pawn on g7 and deliver checkmate.
|
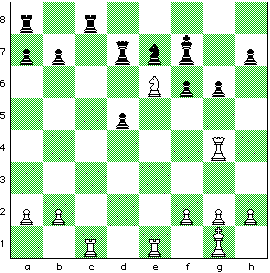
20. ...g6
Blocking White’s threat.
It seems as if White’s attack has failed... but White has one more ace up his sleeve.
|
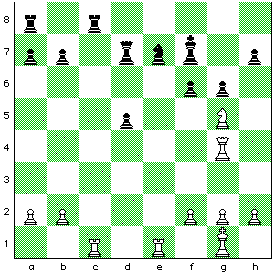
21. Ng5+
Giving check to the Black King, while unleashing a discovered attack on the undefended Black Queen! Do you see it? With the knight out of the way, White threatens to snag Black’s Queen with his own Queen.
Black has only one good move, but even that move is not good enough. Watch and see what happens now!
|
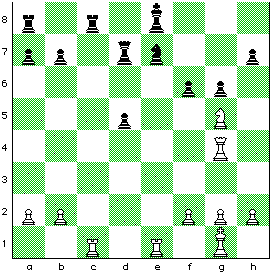
21. ...Ke8
With a heavy heart, Black’s king marches back to the e8 square, which it fought so hard to get away from. It would like to go somewhere else, but it has to defend the beleaguered Queen.
|
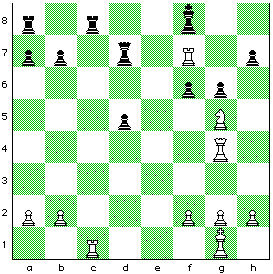
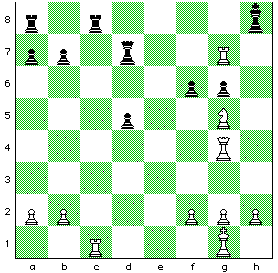
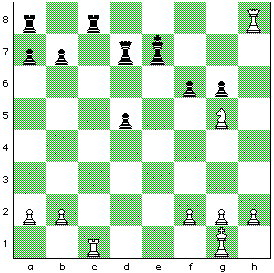
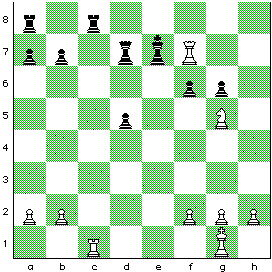
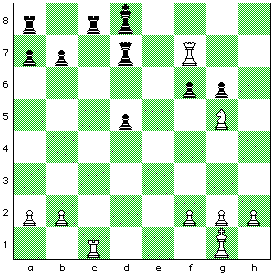
Intrelude: Position after 21. ...Ke8
The spectators watch with bated breath. It looks as if White’s attack has failed, and he is lost. Both White’s Knight and his queen are exposed to capture, and it appears that Black’s king is safely guarded by his rooks (towers of uselessness no longer), his knight and his queen.
But looks aren’t everything!
The spectators watch with bated breath, expicting their beloved World Champion Wilhelm Stienitz to pull some magical move out of thin air, some new threat, a new thrust to make against Black’s seemingly solid position. But in the words of chess writer I. A. Horowitz: "It is no thrust; it is a meat axe."
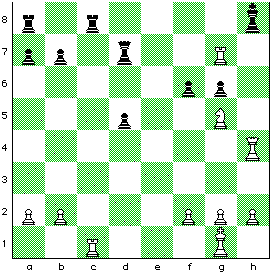
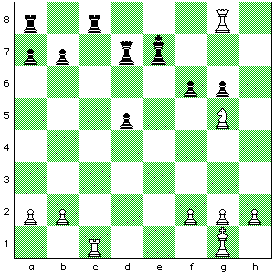
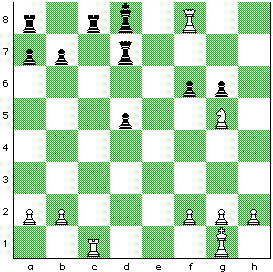
Rxe7+ is the move, crashing through Black’s "solid" king shield! (See diagram.)
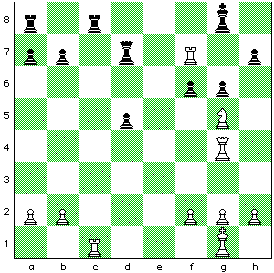
Position after 22. Rxe7+
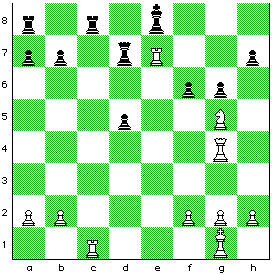
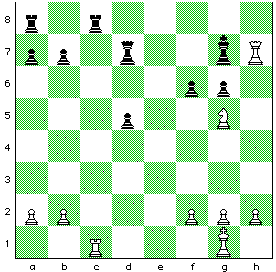
An extraordinary situation— Black can’t take the White Rook, but White can’t capture the Black Queen!
If Black takes White’s rook with the queen, White will snatch the rook on c8— with check.
If Black takes White’s rook with his king, he will be marching his king out into the open, which will allow White to harras the king with his Rook, Knight and Queen. Marching your King out into the open is always a stupid idea, and often results in dead kings!
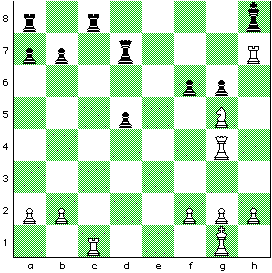
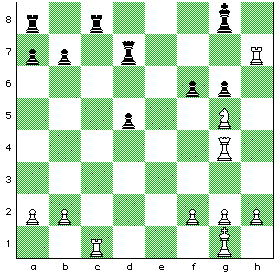
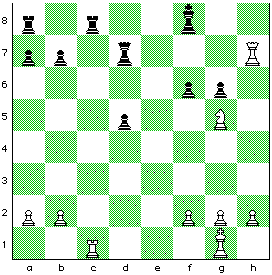
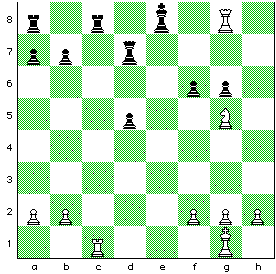
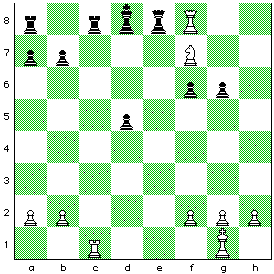
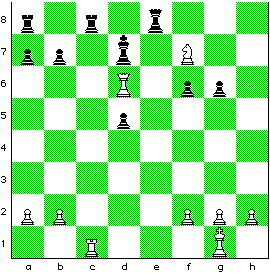
Depressed, Black plays king to f8 (22. ...Kf8. See diagram.)
Position after 22. ...Kf8
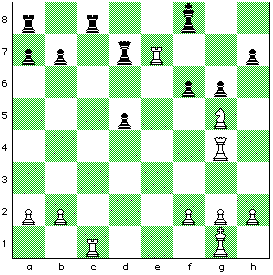
Now White can’t take the Queen, because then Black would respond by snatching white’s rook on c1— giving checkmate! White has to keep the King in check, or else Black will take that rook on c1! What an absurd fix both players are in!
|
 Home
Forum
Starcraft Tournaments
Home
Forum
Starcraft Tournaments