How
Not To BattleReport, Part 3a
Hi again people:
To see Part 1, click here.
To see Part 2, click here.
This time, the whole report is less
than 1 meg, so hopefully you 56kers (I'm one of them, blah) aren't unhappy.
(Last time, the pictures alone added up to 10mb. KE KE KE MONKEY BOY KE KE
KE (Apparently that is the official warning siren if the report is pic
heavy))
Now I'm continuing the unwillingly created 'How Not to BR'
Series with something a bit more original: a chess report. Wait, make that TWO
chess reports. I am now showing you two of my own games.
I'm writing this assuming you know the basic nuances of
chess and want to know a little more. By the way, this report is quite long (as
you can see from the scrollbar) so don't flame my comments section saying:
"OMG YOU ARE GAY THIS REPORT WAS TOO LONG!!!!!!!!!!!!!!!!!!!!".
One thing for sure, I'm not going to
get a 10 because I've used Frontpage to make this report. :(
Anyway: during the length of the report, I will make some comments
in green. They are my attempts at comparing the
actual game scenario to a possible SC scenario. (SC=War3, btw)
Just another thing:
|
! = good move
|
| ? = bad move |
| !? = interesting move |
| ?! = dubious move |
Note to raters: Please rate this.

Game
one
Opponent: White, Rating 1702
Me: Black, Rating 1787
So we started off fairly quickly, and we were off.
My opponent played:
1. e4
expecting some sharp Sicilian Defense, a popular chess
opening which is played by everyone from rank beginner to Kasparov level (in
case you don't know who he is, he is the no1 player in the world). The other
major alternative first moves are 1. d4, 1. Nf3, and 1. c4.
I replied
with 1...c5, obliging and revealing what he had. (Taking
the centre is like taking an expansion, teching, and powering. You have to do
it, or you die. Same goes for development of your pieces.) The other
'big' first moves for Black are 1...c6, 1...Nf6, 1...d5, 1...e6,1...e5, 1...d6,
and 1...g6. The point of the Sicilian Defense (1.e4 c5) is that in most
variations White plays d4, so Black takes the pawn, so that Black can attack
down the c-file, and usually sacs a rook for a knight on c3 to gain the light
squares in the centre. (kamikazing groups of zerglings to
distract his forces, and execute a successful hydra drop)
These concepts
are fairly advanced, so don't feel bothered if you have trouble understanding
them.
2. Nf3 was played, developing the knight and preparing 3. d4.
2...e6 Black lets out the bishop and keeps pieces
out of d5. The cost: weakening the d6 square. (early
expansion: risk of getting it razed, but denying the opponent a siege in there)
3. d4 It was the point of the previous move.
3... cxd4 May as well, since otherwise White just
plays 4. d5 and Black cannot initiate much counterplay. (opponent
having map control)
4. Nxd4 recapturing the pawn. All of these were
played fairly quickly, being opening theory.
4...Qb6!?
This is a little known move. The aims of this move are not so clear at first sight.
Black intends to place pressure on the knight at d4 and on b2. The drawbacks
should be obvious: the queen is taken out too early. Nevertheless, a lot of
strong players play this move with success. (Usually,
taking out your queen early is like scouting with your first worker. Not good,
and you can get pushed around early. But if you get away with it, you can get
important recon.)
5. Nb3
Basically, White has only one major option:
3. Nc3, controlling the centre squares. The point of the move given is that the
knight is removed from any attacks from Black playing Bc5, when, if the knight
moves, Bxf2+ can be very annoying. (Staying at the lower
tier of the tech tree for a while to neutralize any rushes)
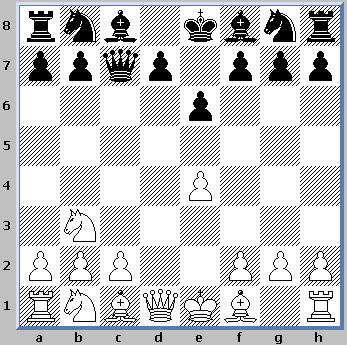
6. Bd3
This move is a bit difficult to explain.
Sure, the bishop is getting blocked by the pawn, but where else can the poor
bishop go? Bc4 hits granite on the pawn on e6, Bb5 does jack, and Be2 is a bit
too passive (Turtling).
The best square is on d3, where after a later e5, the bishop will spring to
life.
6...d6 Stalling any possible e5 by White, for now,
and preparing to develop his knight to d7.
7. Nc3 Developing his knight to a natural square,
and controlling the squares in the centre.
7...a6
Making more pawn moves! While this could be
fatal of White could attack straight away, here White can't do so yet as the
Black position is too solid. (Protoss over-teching
and realizing that the templar is too lonely to be effective against a massive
hydra/ling army. Okay, that was highly exaggerated and didn't make sense, but you get the point)
The point of 7...a6 was to keep guys outta b5. I
felt it could have been annoying.
8. 0-0 Getting the king to safety, and placing the
rook where it could attack later on.
8...Nf6 Finally developing a piece!!! Black intends
to play Be7 and castling when appropriate.
9. f4
White is much further ahead in development,
so he already starts to lay grounds for an attack and masses behind those pawns.
(Massing outside an enemy base before attack)
9...Nbd7
Seeing this, I decided to reinforce defenders
over the point e5, and developed again. You may be wondering about what I'm
going to do with the bishop on c8. Well, jumping ahead, I later played ...b6 and
...Bb7 where it looks perfectly natural (At least to me).
10. Qe2 Placing more attackers over the point e5.
10...Be7
Finally getting ready to castle. Any time
that I play ...d5? is mistaken, as White has already castled and is far better
developed. (Taking on 12 cliffed siege tanks (with siege
mode) with 12 dragoons. Quite stupid.)
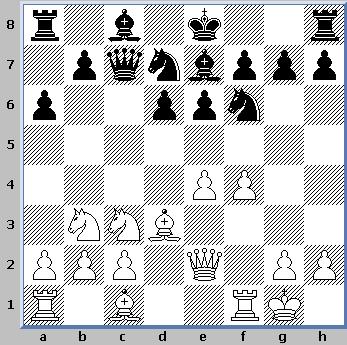
Update: White is getting ready to attack when
he has finished development, by e5. Black is going to castle kingside and play
on the queenside by a later ...b6-b5-b4 and possibly including ...Nc5.
11. Be3
Developing the bishop and starting to get the
heavy guys, aka the rooks, into play. Without rooks, you can't really get
through anything. (Terran attacking without researching
siege mode. Never done.)
11...b6
Preparing to 'fianchetto' the light-squared
bishop. Some of you may wonder why on earth I shouldn't castle immediately.
Well, suppose right here, White plays something like 12. g4?! and completely
concentrates on the kingside. Black can just wait. When White reaches the
pinnacle of his extension, Black can just castle queenside, and White is left
looking quite stupid.
12. Rae1 As I said before, White's strategy here is to
build up behind the pawns, then attack.
12...Bb7 As said before. Black waits to see what White
is up to.
13.Bf2!?
A rather interesting idea. White relocates
the bishop so that he can play e5, and he could get the bishop itself to do
something else. (Consolidating your defense before
attacking) Other possible alternatives are playing 13. a4, preventing
...b5, or 13. Bd2, guarding against any sacs on c3 I mentioned earlier and also
playing for e5.
13...0-0
13...0-0-0? loses a pawn to 14.Bxa6. With
this move, Black is nearly fully developed and is ready for either attack on the
queenside, or defense on the kingside.
14. Bh4?!
Not especially well-placed. White probably
ought to do something immediately, for example 14. e5!? which is definitely
worth a look. After 14... Nd5 15. Nxd5 Bxd5 16. c4! Bb7 17. Bd4 White appears to
be slightly better.
14... Rfe8
For those of you who don't know, White is
threatening to play 15. e5 Nd5 16. Nxd5! Bxd5 17. Bxe7 winning a piece, among
other things. 14...Rfe8 defends the bishop so that doesn't happen. Nevertheless,
14... e5!? is probably worth having a look. It physically prevents e5, and
breathes new life to some of the Black pieces, while making the rook on e1 look stupid.
15. e5
May as well go through with that plan,
otherwise White will be left with no counterplay against Black's queenside
attack. (Not being aggressive in a ZvP or ZvT match.)
15... Nd5 Forced
and good. There is no other good move.
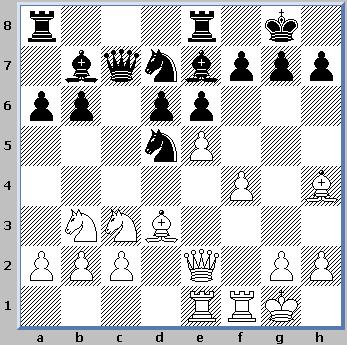
Now comes a stupid move.
16. Ne4???!
The three question marks are for the real
value of the move, while the exclamation mark is the surprise value of the move.
White simply intends to sac his bishop (and a rook!!!) for a meagre attack,
which is definitely not enough for the lost material. (Losing
a valuable expansion simply for a chance to attack. May as well save the
expansion.)
Better would be 16. Nxd5 Bxd5 17. Bxe7 Rxe7
18. Nd4, when White has a slight advantage.
16...Bxh4 Of
course. Why not? Now White, not surprisingly, is actually losing already!
17. Nxd6 For reasons that I won't go
into, this is the best move.
17... Bxe1 Grabbing the rook, and now
I am enormous amounts of material ahead (More expansions,
better tech, more units, and more income).
18. Bxh7+ The best try here. Other moves lose very
quickly.
18... Kh8
If you play the mistaken 18...Kxh7?? then you would be
shocked by 19. Qh5+ Kg8 20. Qf7+ Kh7 21. Qh5+ with perpetual check. With the
move I played, White is q-u-i-t-e busted.
19. f5
Desperately trying to get something for the
lost pieces. After 19. Qxe1 or Rxe1 I was planning 19...g6! trapping the bishop
as well as preventing 20. f5.
19... Qxd6???!!!
The three question marks are for the actual
value of the move and the three exclamation marks are for the surprise value. Of
course, there was no need for this move, but my opponent was severely short of
time, and that explained my decision. (Sacking your only
expansion so that you can get to his main and eliminate the opponent.)
Also, I just wanted to have fun! By
the way, a simple move like 19...Bb4 would have done the job. White's simply
sacked too much stuff.
20. exd6 Of course, what else? White
takes what he can before he gets mated.
20... exf5, capturing a pawn in the
bargain and gaining valuable time since the rook's attacking the queen as well.
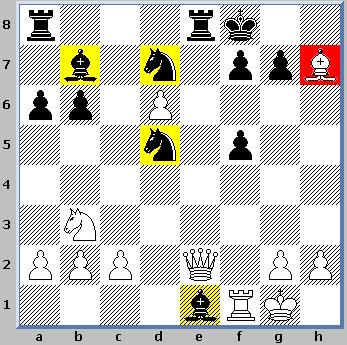
Update: Black's just sacked his queen back,
and now Black has a rook, bishop and knight for a queen and pawn. In addition,
the bishop will be trapped in enemy territory after ...g6.
(Poor
Deon trapped by Mark4's evil gang of zealots) In conclusion, Black is
much better here.
21. Qd1 Probably the safest square, on
other squares she might get hurt.
21...Ne3!??
Interesting. Before playing ...g6
Black trades in a knight and bishop for a rook. Not a good trade at first sight
(Knight and bishop value = 3, Rook value = 5. 3+3 > 5.) But have a closer
look. I'm gonna place two rooks on the e-file ('double'), and with the power of
the bishop on b7, attack his king. White can't trade his queen for two rooks as
the bishop would be lost. Add this up to the fact that White has very little
time to complete his remaining moves and you can see that the chances are very
heavily in my favour.
22. Qxe1. Forced.
22... Nxf1 Not much to say
either.
23. Qxf1 Taking the knight,
but now the queen is badly placed.
23... g6! Trapping the
bishop, now Black virtually is a bishop ahead.
24. Qc4 White spent virtually
all his remaining time on this move. White hopes to be able to play Qd4! when
Black would be in deep shit! However, White never gets to play that. Also worth
mentioning is 24.Nd4, to bring it into play (Notice that ever since I provoked
the horse to move away it never really came back into play). However, Black
should still be easily able to win due to his immense activity, and should play
24...Re5! to cover the critical f5 point.
24...Re1+ Gaining time to
double rooks on the e-file, and making the White king feel vulnerable to
attacks.
25. Kf2 The only good move.
25...Rae8.
Finishing the super-power on the e-file. White is losing now, and with very
little time remaining he failed to find the best defense.

26. Qd4? Better
was 26. Nd4! when Black's game is much harder to win. Then Black's best move is
26...Re5! when he is still winning, but White could fight on. As it stands,
White loses immediately.
26... R1e2+! Forcing the king
to tell Black where it is going to go.
27. Kf1 No alternative could
stand either. If 27. Kg1, then 27...Re1+ 28. Kf2 R8e2+ 29. Kg3 Rxg2+ 30. Kh3
Re5! and White can do nothing to prevent g6-g5-g4. Or 27. Kg3 Rxg2+ 28. Kh3 f6!
and Black threatens ...Rg4 and ...Bg2+ and again, White can do nothing to stop
it, apart from losing his queen.
27...Bxg2+ Trapping
the king back into his corner.
28. Kg1
The only legal move, but then comes...
...28...Ne5! intending
29..Nf3#. It also prevented the *rather* embarrassing 29.Qh8# and also stops all
checks!
29. Nd2 Really
the only move, but then comes:
29... Rxd2!
A nice way to finish the game.
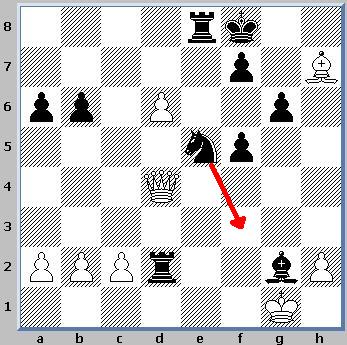
0-1
White now lost on time, but it is easy to see that after 30. Qxd2 Nf3+ 31. Kxg2 Nxd2
Black has an easy win. (Heh. The bishop still can't get out)

GG! I thought that White played far
too recklessly and that my queen sac was completely unnecessary. Otherwise it
was an interesting game. The next part will be out next week.
PS. My email is gpattack@msn.com.
Before you ask, yes, I have MSN Messenger.

|
 Home
Forum
Starcraft Tournaments
Home
Forum
Starcraft Tournaments

