']['amaraw
VS
Datanett
INTRO
I just lost to mass hydra after a failed rush in the map Predator using 6 lings
and an offensive sunken. Good players can easily fend off early rushes, now i
learned how to counter that rush. I then tried to join a public game instead of
creating one. I saw 1 on 1 game with a yellow lag and entered the game.
MAP
The battle takes place in the map Challenger.
RACES
Both players opted to go random. I always random even if a certain race clearly
have an advantage over the map. It also adds to the fun and challenge.
BATTLE BEGINS
']['amaraw got terran and did a supply at 7 and a rax at 8. Scouted using
an SCV before the the rax is completed.
SCOUTING AND EARLY HARRASMENT
Datenett also got terran to command. My SCV managed to kill a worker that
just came out of the CC. He didn't rallied the SCV to another point,
it was just sitting in front of his CC. Fleeing after seing a marine came
out of the barracks. Reporting to main that enemy terran is a little
defensive, as he made a bunker.
MAKING A PLAN
I'll try to early contain the bastard. With accumulated minerals after
puppeteering my SCV, i made a refinary and an academy ASAP with non-stop
marines from my rax. The enemy used a marine to scout, and was dispatched
by defending marines. I made another barracks and another supply depot.
FIRST MAJOR BATTLE
He attacks with a group of marines, but got clobbered by my marines with
medic support. I got range upgrade first and microed my marines. Killing
them one at a time while my medics heal wounded soldiers.
COUNTER-ATTACK
After ammassing about 12 marines and 4 medics, i decided to counter. And
alas, he made a bunker in his choke w/ marine and a medic of his own. I
was committed and attacked anyway. Killed the medic first and tearing
apart the SCV repairing the bunker, i managed to get his bunker too. He
sent a massive amount of marine reinforcement so i retreated whatever i can,
but only saved 3 marines.
WINDOW OF OPPORTUNITY
He didn't follow, so i decided to push my containment just outside his choke.
I scanned and saw the machine shop's gears rolling - a sign of research. I
rallied my troops near the opening of his choke. I scanned again a
little later and found out that he's got seige tanks at his choke too. At
the same time I researched siege mode from my single factory. And placed a
single tank together with the marines and medics in the encampment. Didn't
make any bunkers as siege tanks are being produced at this point of the game.
But placed a single turret just to fend off possible wraiths and for extra
vision for my tank.
PLAN NUMBER TWO
Made a starport to produce dropships and expand on the island expansions.
Or a possible drop on less defended areas of his main.
THE DEADLY DROP
Two tanks dropped on the ledge shooting at the hapless SCVs. No i didn't do
that, my opponent was thinking of the same thing as i am. I removed my
SCVs from the minerals and dropped 4 marines and got one of the tanks - he
unsieged the tanks took out the marines. Should have rid of this 2
tanks without a problem if i didn't stimmed the marines without medic support.
I got the other using a tank drop of my own. But not before heavily damaging
my base. Took out one supply depot, academy and my scanner. Though i lifted
off both my engineering bay and barracks to a safe place to continue marine
production after cancelling my armor upgrade Back to work for my SCVs
and rebuilt my lost key structures. And placed a useless two siege tanks
behind my mineral line and another turret just at right side of the tanks in fear
of another drop
PREPARING FOR THE FUTURE AND EXPANSION HUNTING
I placed an SCV on my left island expansion for future use. Also needed to
retaliate rather than just being contented in defending, i searched for an
expansion at top right island. But found nothing.
RETURNING THE FAVOR
Passing the right side of his base i saw a second command center being
built - sign of preparing to expand on his island expansion. Using my own
version of sieging the worker lines with 4 marines and a tank. After
unloading the cargo, i ordered my dropship to get back at main. I didn't
see how much damage my worker harrasment did, as i was preparing another
drop on upper right island. But he did stop the siege using two drops of
marines.
CRUCIAL BATTLE
I unloaded marines and medics in his island expansion and force the CC to
lift. He fought back and re-took the island using marine and medics of his
own.. I used 3 dropships having two half-loaded dropships filled w/ marines,
medics and SCVs. While the other carried a tank and an scv. Ambushed by a
single wraith and passing under a missile turret, i lost one dropship
carrying my tank. The battle ensues, marine and dies right and left for
both sides. I quit using micro management on the units as i saw my last
marine fall down At the same time, he also retaliated and clobbered my lone
SCV on the lower left island.
MY HERO SCV
I managed to kill his last remaining marine and medic in the top right island
by a lone SCV and 2 medics whom i thought all died during the failed attack :)
Targetted the medic first and then the poor marine was hacked and slashed to
death by my SCVs fusion cutter.
SECURING THE ISLANDS
Instead of making a lot of turrets in the island. I created two barracks then
a bunker. About two more skirmishes happened in the top right island
which i defended nicely having two barracks pumping marines and medics.
THIS IS FUN, SWITCHING PLACES
We got each others natural island expansions. No action for about a minute
or so, as both commanders replenished lost troops.
GOING AIR
I checked his island expansion with a lone wraith and was quickly dispatched
by a bunch of missile turrets. But i found weakness in his defensive setup.
A drop of marine and medics behind the mineral line followed. Slaughter
began, for my marines and medics as cloaked wraiths were waiting for the
ambush. I used a floating engineering bay to act as a spotter for my siege
tanks, but didn't do any good as the turrets are cleverly placed beyond my
tanks range. My engineering bay got nailed by the wraith fleet. I built
another 2 starports, one at main and another at the expansion to negate his
air superiority. And build two armories for the air upgrade. Trying to pump
out air units and having upgrades and only having one mining source is a definite
no-no (my main is almost dry at this point). I expanded again at the
middle right island. Constructing an new engineering bay and two turrets,
to discourage drops.
UNWISE DECISION
Having found out my new expansion, my opponent raided the new expansion with
wraiths. Datanett didn't killed my SCV that repairs the turret he's currently
targetting. Thus he lost all of his wraiths while i lost only one turret.
SECURING THE ISLAND
I transferred marines and medic and also rallying all of my newly built wraiths
at the new income node. He tries to unload two drop ship worth of i don't know
what - they got blown off the sky by massive fire from bunkered marines and
supporting wraith fleet. I then checked the middle left
island and found a turret and another one being built. I took out the SCV,
ignoring the marine fire after a scan sweep. I left for about a second or
two to wear out the "scan sweep" then proceeded to wipe out the remaining
ground troops. Another scan sweep and gemini missiles coming off from my
opponents' wraith fleet killed most of my wraiths. I mangaged to saved just
one wraith in this tragic moment.
UNDER SIEGE
I seiged the middle left island, clearing missile turrets to finish it off
with a drop of marines and medics . He fought valiantly with wraiths but i
had lots of missile turrets of my own that fended off the cloaked fighters.
I dropped a fully loaded dropship with marines and medics and killed all the
SCVs. He fought using his remaining wraiths but lost. He tried saving the
expansion with a drop of his own, but were slaughtered by 3-4 marines w/ 2
medics, killing the marines unloading from the dropship one at a time. I
even told him that he should have micro managed his drop.
TAKING OUT THE ACES IN HIS SLEEVES
The sky went dark as a group of 4-5 battlecruisers massacred my puny marine
medic army. And also took out my science vessel with a yamato strike. I
said "shit" in frustration. I thought he was going to finish me off with
the fleet But opted to secure the island.
MAKING COUNTERS
I ordered for ghosts and researched for lockdown, constructed goliaths and
researched for charoon boosters and constructed a nuke silo to take out the
island.
UPGRADED UNITS WINS THE DAY
He tries to breach my containment using tanks, marine and medics. He
succeeded in taking out my two siege tanks. But i tore them up using marine
and medic reinforcments, i noticed how easily my marines butchered his group
of marines. I guess he didn't upgrade his units, i only have 2/1 marines -
switched research on air which is now 3/3. I tried to nuke his heavily
defended choke at main to raze his key structures but got blown by seige
tanks. I failed to research optical sight. So i researched the sight
upgrade. Then nuked his thriving expansion at 11 o'clock. But he manages
to take away his workers just in time before the nuke drops. But a secondary
attack of marines and medics wipes out all the SCVs.
GOING FOR THE KILL
I proceeded to nuke his middle left island this time. BOOM, i scan sweeped
and got his SCVs and only 3-4 battlecruisers remain. During this moment i
also expanded to both mineral only and vespene gas only epansions on the
right side of the map. I followed it up using my wraith squadron - but
forgot all about my 2 valks. First taking out the science vessel and then
proceeded to wipe out the battlecruisers without support. I then ordered my
wraiths to infiltrate the enemy base, and took out his scanner first then
proceeded to attack the control towers of both starports. Denying him to
produce any powerful air units.
LAST BATTLE
Datenett tries to secure 11 o'clock using a massive force of marine and
medics. This army easily killed my token army of marine and medics in the
area. But they were no match for my cloaked wraiths. With no mobile
detector and without a scanner, he finally surrenders. "GGs" were exchanged
and he left.

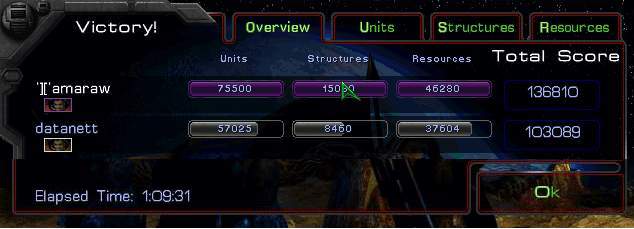
STATISTICS

LEASONS LEARNED
1) Retreating is good, never waste units if clearly loosing. Especially on
the early part of the game. (Counter-Attack)
2) Harrasment divides an opponents attention to both defence and offense.
(Returning the Favor and Under Siege)
3) Never give-up on a plan if there's progress. (Crucial Battle)
4) Defense is key on islands (Securing the island)
5) Regrouping before an attack is a must, If Datanett attacked using a
variety of different units at the same time. Many units could have been
preserved doing this. He shouldn't have lost a full dropship of marines
and medics, if he attacked using his BCs first. (Taking out the aces in his sleeves)
6) Keep focused and make appropriate counters to units (Making Counters)
7) Never fail to seize an opportunity - i felt that Datanett could have
changed the tempo of the game if he attacked me all-out using the BCs
together with his SV, marine, medic and tanks. I got no real counters for
the BCs at that time.
7) As always, create a good mix of different units to have multiple options
in a given situation.
NOTE: It's good to make a battle report wherein I win. It look as if i'm a
good player when i'm writing the report :P
I'll try to write a losing match sometime wherein its still fun to read
and a lot of things to learn.
Sorry no screen shots for battles, i'm just too occupied to press the
printscreen key during the game.
|  Home
Forum
Starcraft Tournaments
Home
Forum
Starcraft Tournaments